僕が普段愛用している Neovim プラグインを紹介します。
1. プログラミングを快適にする (LSP・シンタックス)
nvim-lspconfig, mason.nvim, mason-lspconfig.nvim
- Neovim を IDE 化します。
- mason で各種言語のサーバー(Lua, Python, Rustなど)を簡単にインストールでき、lspconfig でそれらを有効化します。自動補完や定義ジャンプが可能になります。
設定方法
  {
    "williamboman/mason.nvim",
    build = ":MasonUpdate", -- インストール時にレジストリを更新
    config = function()
      require("mason").setup()
    end,
  },
  {
    "williamboman/mason-lspconfig.nvim",
    dependencies = {
      { "williamboman/mason.nvim" },
      { "neovim/nvim-lspconfig" },
    },
    config = function()
      require("mason-lspconfig").setup({
        ensure_installed = { -- 自動インストールしたいサーバーをリストアップ
          "lua_ls", "pyright", "ts_ls", "vimls", "gopls", "html", "jsonls",
          "cssls", "marksman", "terraformls", "vuels", "dockerls", "yamlls",
        },
      })

      require("mason-lspconfig").setup_handlers({
        -- 自動セットアップ
        function(server_name)
          require("lspconfig")[server_name].setup({})
        end,
      })
    end
  },
nvim-treesitter
- 標準のハイライトよりも圧倒的に細かく、正確にコードに色が付きます。コードの構造を解析するため、インデントや選択範囲の拡張なども賢くなります。
設定方法
  {
    "nvim-treesitter/nvim-treesitter",
    build = ":TSUpdate",
    lazy=false,
    opts = {
      highlight = {
        enable = true,
        disable = {},
      },
      ensure_installed = { "hcl", "terraform" },
      sync_install = true,
    },
  },
blink.cmp
- 超高速な自動補完エンジン。
- 長らく nvim-cmp が主流でしたが、現在はこの blink.cmp が「設定が簡単で爆速」として非常に人気です。
- こちらは別途解説記事を書きたいと思います。
設定方法
長いので折りたたみにしました
  {
    'saghen/blink.cmp',
    -- optional: provides snippets for the snippet source
    dependencies = { 'rafamadriz/friendly-snippets' },

    -- use a release tag to download pre-built binaries
    version = '1.*',
    -- AND/OR build from source, requires nightly: https://rust-lang.github.io/rustup/concepts/channels.html#working-with-nightly-rust
    -- build = 'cargo build --release',
    -- If you use nix, you can build from source using latest nightly rust with:
    -- build = 'nix run .#build-plugin',

    ---@module 'blink.cmp'
    ---@type blink.cmp.Config
    opts = {
      -- 'default' (recommended) for mappings similar to built-in completions (C-y to accept)
      -- 'super-tab' for mappings similar to vscode (tab to accept)
      -- 'enter' for enter to accept
      -- 'none' for no mappings
      --
      -- All presets have the following mappings:
      -- C-space: Open menu or open docs if already open
      -- C-n/C-p or Up/Down: Select next/previous item
      -- C-e: Hide menu
      -- C-k: Toggle signature help (if signature.enabled = true)
      --
      -- See :h blink-cmp-config-keymap for defining your own keymap
      keymap = { preset = 'default' },

      appearance = {
        -- 'mono' (default) for 'Nerd Font Mono' or 'normal' for 'Nerd Font'
        -- Adjusts spacing to ensure icons are aligned
        nerd_font_variant = 'mono'
      },

      -- 補完ウィンドウの見た目を少し豪華にする(オプション)
      completion = {
        menu = { border = 'rounded' },
        documentation = { window = { border = 'rounded' } },
      },

      -- Default list of enabled providers defined so that you can extend it
      -- elsewhere in your config, without redefining it, due to `opts_extend`
      sources = {
        default = { 'lsp', 'path', 'snippets', 'buffer' },
      },

      -- (Default) Rust fuzzy matcher for typo resistance and significantly better performance
      -- You may use a lua implementation instead by using `implementation = "lua"` or fallback to the lua implementation,
      -- when the Rust fuzzy matcher is not available, by using `implementation = "prefer_rust"`
      --
      -- See the fuzzy documentation for more information
      fuzzy = { implementation = "prefer_rust_with_warning" }
    },
    opts_extend = { "sources.default" }
  },
2. 見た目と使い勝手を向上させる
lualine.nvim
- ステータスライン(画面下部のバー)をオシャレにする。
- 現在のモード、ファイル名、Gitのブランチ、LSPの状態などを綺麗に表示できます。
設定方法
  {
    'nvim-lualine/lualine.nvim',
    dependencies = { 'nvim-tree/nvim-web-devicons' },
    opts = {},
  },
以下のような感じで表示されます。

gitsigns.nvim
- Gitの変更箇所をエッジ(行番号の横)に表示します。
- どの行を追加・変更したかが一目で分かります。変更箇所へのジャンプや、その場での git blame 確認も可能です。
設定方法
  {
    'lewis6991/gitsigns.nvim',
    opts = {},
  },
bufferline.nvim
- 画面上部にタブのようにファイル名を表示します。
- ブラウザのタブのような感覚で開いているファイルを管理・切り替えできます。
設定方法
  {
    "akinsho/bufferline.nvim",
    version = "*",
    dependencies = 'nvim-tree/nvim-web-devicons',
    opts = {},
    keys = {
      -- Tab で次のバッファへ
      { "<Tab>", "<cmd>BufferLineCycleNext<cr>", desc = "Next buffer" },
      -- Shift + Tab で前のバッファへ
      { "<S-Tab>", "<cmd>BufferLineCyclePrev<cr>", desc = "Prev buffer" },
      -- Leader + bj でバッファを直感的に選択 (Pickモード)
      { "<leader>bj", "<cmd>BufferLinePick<cr>", desc = "Buffer pick" },
      -- Leader + bc で他のバッファをすべて閉じる
      { "<leader>bc", "<cmd>BufferLineCloseOthers<cr>", desc = "Close other buffers" },
    },
    lazy = false,
  },
ファイルを開いているときに、:e test.txt のように新たにファイルを開くことでタブが追加されます。

ちょっとハマったのですが、デフォルトではキーバインド設定がなさそうでした。タブを移動するにはマウスでタブをクリックするか、:BufferLineCycleNext :BufferLineCyclePrev のようなコマンドを実行するしかありません。
上記の keys に設定しているように、当該コマンドに keymap を設定しましょう。
3. ブログ執筆・テキスト編集に便利
windwp/nvim-autopairs
- カッコを自動で閉じてくれます。
(と打てば自動で)が入力されます。地味ですが入力の手間が激減します。
設定方法
  {
    "windwp/nvim-autopairs",
    event = "InsertEnter",
    config = true
  },
render-markdown.nvim
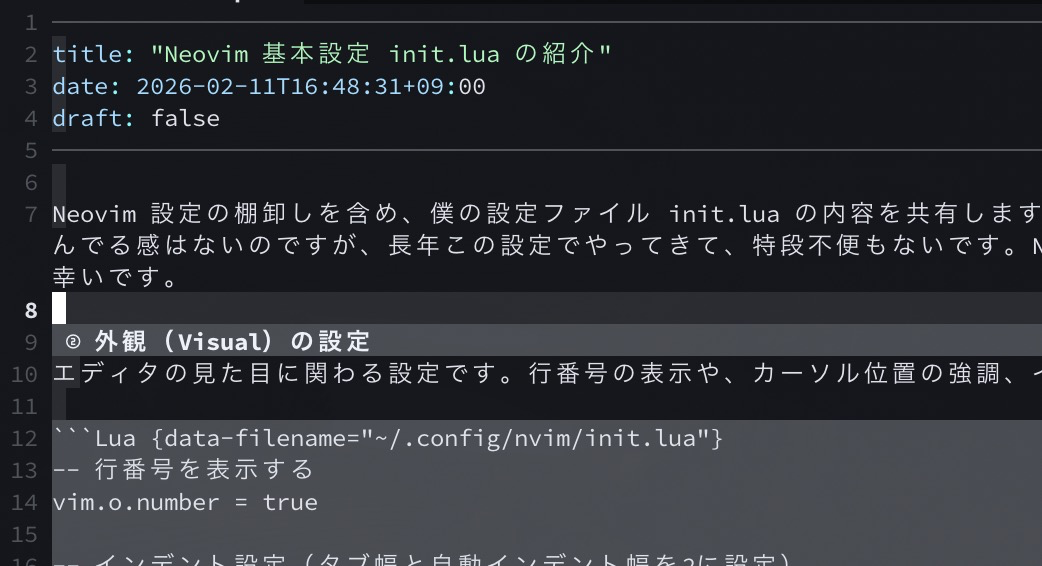
- Neovim 上で Markdown をリッチな見た目(見出しにアイコンが付く、チェックボックスが綺麗になるなど)にレンダリングします。
設定方法
  {
    "MeanderingProgrammer/render-markdown.nvim",
    dependencies = { "nvim-treesitter/nvim-treesitter", "nvim-tree/nvim-web-devicons" },
    opts = {},
  },
以下のようにMarkdown が見やすくなり、編集効率が改善されるかもしれません。
img-paste.vim
クリップボードの画像を Neovim 経由で直接取り込むことができます。
設定方法
  {
    "img-paste-devs/img-paste.vim",
    lazy=false,
  },
詳細は以下の記事をご確認ください。
このブログは Neovim を使って書いているんですが、画像を挿入するときはかなり面倒です。
以前 Windows 環境で記事を書いていたときは、記事で紹介した VSCode プラグインの Paste Image を使っていました。
コピペでmarkdownに画像を取り込む VS Code plugin Paste Image を試す 以前の記事で軽く紹介させてもらいましたが、コピペするだけで markdown に画像が挿入できる VS Code プラグイン Paste Image を試したいと思います。 真面目に調べたら、すでにとても多くの人が試していて、何番煎じかという感じですが。。。気にせずやっていきます。 はじめに このブログは Windows の WSL2 上の vim で作っているので、そもそも VS Code ではなく Vim で同じことが実現できればそっちのほうがいいなと考えました。 で少し調べたところ、md-img-paste という vim プラグインがありました。 結論からいうと、テキストはクリップボード共有できたのですが、md-img-pasteを使った画像ペーストはできませんでした。できた方がいれば教えてください。 テキストのクリップボード共有はこちらを参考にご対応いただければ。ちなみに、これは僕だけかもしれませんが、DISPLAY変数を設定した状態だと vim 起動自体がとても遅く(体感3秒くらい)なりました。。。なので、結局クリップボード共有自体使うのをやめました。 設定方法 Paste Image をお持ちの VS Code に追加します。 config.jsonに以下の設定を追加します。 pasteImage.basePath markdown上で指定する画像ファイルのパスのベースパスを指定します。ここを基準として、pasteImage.pathへの相対パスを出力する形になります。 Hugo では、.../static/ がデフォルトのstaticコンテンツ置き場として構成されています。参考 さらに、僕の場合は画像ファイルはさらにその配下に /img を作って格納するようにしていますので、markdown からは基本的に/img/xxx.pngのような形で指定するようにさせたいわけです。結局、hugo の static ファイル置き場に合わせる、が基本的なやり方になるだろうと理解しています。 pasteImage.insertPattern ペースト時に生成される画像ファイル名を指定します。特にこだわりなければそのままでOKです。 pasteImage.path ペースト時に生成される画像ファイルの置き場所を指定します。画像置き場やmarkdownファイル置き場の設定によって変わってくるので、こちらは個人の設定に合わせてご対応ください。 現状の僕の設定を以下に公開します。 { @a2ito Mac になってからはエディタを Neovim にしており、VS Code にイチイチ切り替えるのが嫌で上記のプラグインも使わなくなっていました。Mac では Shift + Command + 4 のショートカットで画面キャプチャを取得できるので、キャプチャ取得→リネームして画像フォルダに保存→マークダウンでファイルパスを追記、というとても面倒な方法で画像を挿入していました。
@a2ito